Creating An amazing GLASS TEXT with Photoshop
Creating An amazing GLASS TEXT with Adobe Photoshop
You can take any background to work with.
I am using this pink coloured striped pattern for my glassy text effect that I have created using the same Adobe Photoshop Software.
Click On Images to Enlarge.
Fig1

Choose a stylish font you have or any other you wish to and type whatever you want and then duplicate this text.
I have typed our Organization’s (Techdivine) abbreviation TD.
Fig2

Step 1
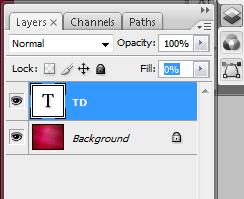
Set the fill opacity of the text to 0% and start off the effects.
Fig3
Step2
Go to blending by right clicking on the text layer and selecting Blending Options
Fig4
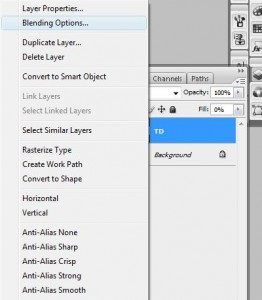
We are using lots of effects from the Blending Options. We are also adding Contours to make the effect on the text more real. As Below:
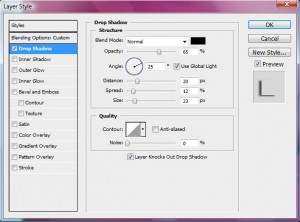
- Starting with Drop Shadow
- Select the Drop Shadow option
- In the right pane, change Blend Mode to Normal and color black
- Set Opacity to 65%
- Angle to 25°, check the box Use Global Lighting
- Set Distance to 20px
- Spread to 12% and Size to 23 px
Fig5
Step 3
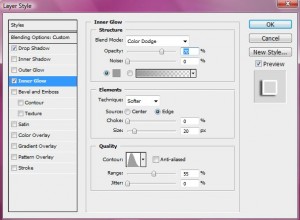
- We will now give Inner Glow
- select Inner Glow from left pane.
- Change Blend Mode to Color Dodge
- Set opacity to 70%
- Noise 0%
- Set the color to grey shade (#9b9b9b)
- From the Elements
- Change Techniques to Softer
- Source Edge
- Choke 0%
- Size 20px
- From Quality
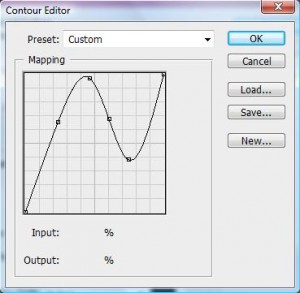
- Edit the Contour option create the shape like in the image below
Fig6
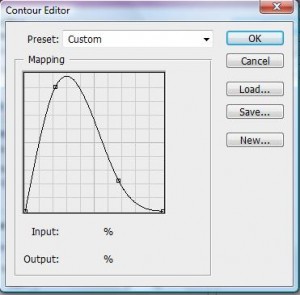
Back to the Quality
Set the value of Range to 55% and Jitter 0%
Fig7
Step 4
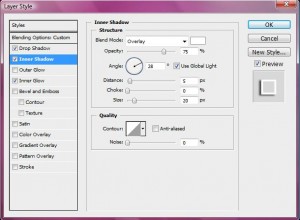
- Now Select Inner Shadow from left pane.
- Change the Blend Mode to Overlay and color White
- Set Opacity to 75%
- Angle to 28°
- Distance 5px
- Choke 0%
- Size 20%
Fig8
Step 5
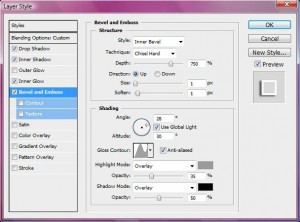
- Select Bevel & Emboss from left pane
- In the right pane under Structure
- Change the Style to Inner Bevel
- Technique to Chisel Hard
- Set the value of Depth to 750%
- Change the Direction to Up
- Set the value of Size and Soften to 1px
- Under the Shading options
- Angle is 28° by default
- Set the Altitude to 20°
- Edit the Contour option and create the shape like in the image below
Fig9
Check the box Anti-aliased
Now Change the Highlit Mode to Overlay and change the color to grey shade (#9b9b9b) with Opacity 35%
Change Shadow Mode to Overy and change the color to black with opacity 50%
Fig10
Step 6
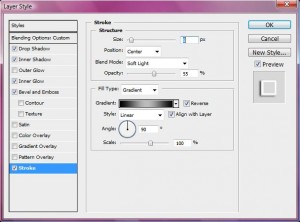
- We will now give a stroke to the text
- Select Stroke from the left pane
- Now in the right pane
- Set the Stroke Size to 8px
- Change the Position to Center
- Blend Mode to Soft Light and set the Opacity to 55%.
- Change the Fill Type to Gradient
- Change the Gradient pattern as shown below in the image and check the box Reverse
- Change the Style as shown and check the box Align with Layer.
- Set the Angle to 90° and scale to 100%
Fig11
Step 7
- At this step our half work is done
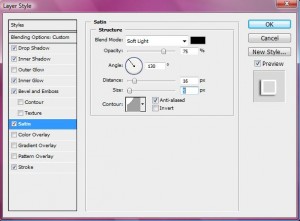
- Select Satin from the left pane
- Change Blend Mode to Soft Light and color to Black
- Set opacity to 75%
- Set the Angle to 130°
- Change the values of Distance to 16px and Size to 5px
- Change the Contour to 5th pattern Check the box Anti-aliased and uncheck the box Invert.
Fig12
Now our image should be looking like this
Fig13

But we can still work on our text to get much better output and will look much more awesome.
Select the Text copy which you at the very start made and hide the original text layer. This time we will work with some spectacular highlights and some very soft shadows falling to the backgroud.
Step 8
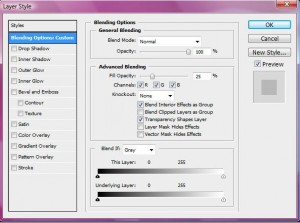
- Go to the blending mode of this layer
- Change the Fill opacity of this layer to 25%.
- Under Advance Blending
- Check the boxes of Blend Interior Effects as Group
- and Transparency Shapes Layer and rest uncheck the boxes.
Fig14
- Step 9
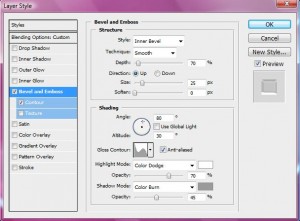
- Select Bevel & Emboss
- Come to the right pane
- Under Structure select Style as Inner Bevel,Technique as Smooth
- Set the Depth value as 70%
- Select Up Direction
- Set the values of Size to 25px and Soften 0px
- Under Shading Set the Angle to 80°
- Uncheck the box of Global Light and set the Altitude to 30°
- Change the Gloss Contour to 4th pattern from second line in the menu and check the box Anti-aliased
- Change Highlight Mode to Color Dodge and color White with opacity 70%
- Change Shadow Mode to Color Burn and color to grey shade (#9b9b9b) with opacity 45%
Fig15
- Step 10
- We will now give some shadow to this layer.
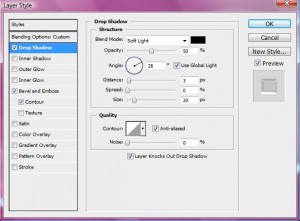
- Select Drop Shadow and change the values as below
- Blend Mode Soft Light and color Black with opacity 50%
- Angle to 28° and check the box Use Global Light
- Distance 3px
- Spread 0px
- Size 20px and Check the box for Anti-aliased for Contour under Quality.
Fig16
Step 11
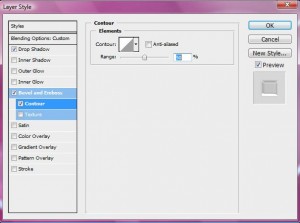
In the left pane under Bevel & Emboss select Contour
Set the Range to 40% and check the box Anti-aliased.
Fig17
We are almost done with our text part. The Image should now look somewhat like this
Fig18

But you must be wondering that there isnt any light reflection on our background image. So at our last step we will complete that too.
Just create a new layer under the original text or above the background image
Step 12
After creating the new layer and as this layer is active press Ctrl+G to group this layer.
What happens when we change the Blending Mode of this group to Color Dodge is that, Dodging this grouped layer is a quick way of blending with white color with transparent layer. And with the new layer still active, while pressing Ctrl click on any of the text layer to make the selection of the text.
With your empty color dodged layer selected, click the Add layer mask icon in the bottom of your Layers palette and then do a Ctrl + I to invert the mask. You’re ready to start dodging.
Use a soft white brush, about 45px in size and 15% flow, and make some gentle strokes in front of the glass’s highlights. You can tone down the layer’s opacity (80%) if things get a little too bright. Final Image Below:

Have Fun!
For More Such Tutorials & Freebies Updates: CONNECT With Us Here:
Tweet with Us @techdivine Here
Join Us in Facebook Page: Techdivine Creative services Here
Join Us in Facebook Group Here
————–
Related Posts:
How to Create Rain Effect with Photoshop
